Sonic Pi makes some noise!
Introduction
In today’s tech-driven world, few tools match the accessibility and versatility of the Raspberry Pi. This small, affordable computer supports a wide range of projects, from programming basics to advanced DIY. Recently, I explored combining Raspberry Pi with Sonic Pi, a live coding environment that turns code into music. Together, they create a dynamic platform for music lovers and coders, transforming Ruby code into sound.
Originally designed to teach coding through music, Sonic Pi allows users to explore sound synthesis and digital music. Paired with Raspberry Pi, it enables everything from ambient tones to complex beats. This experiment was a first hands-on before making my own keyboard.
In this task, I’lls share what I did to make my first sounds and how to make it run at every power-up. Transforming the Pi into a standalone embedded keyboard.
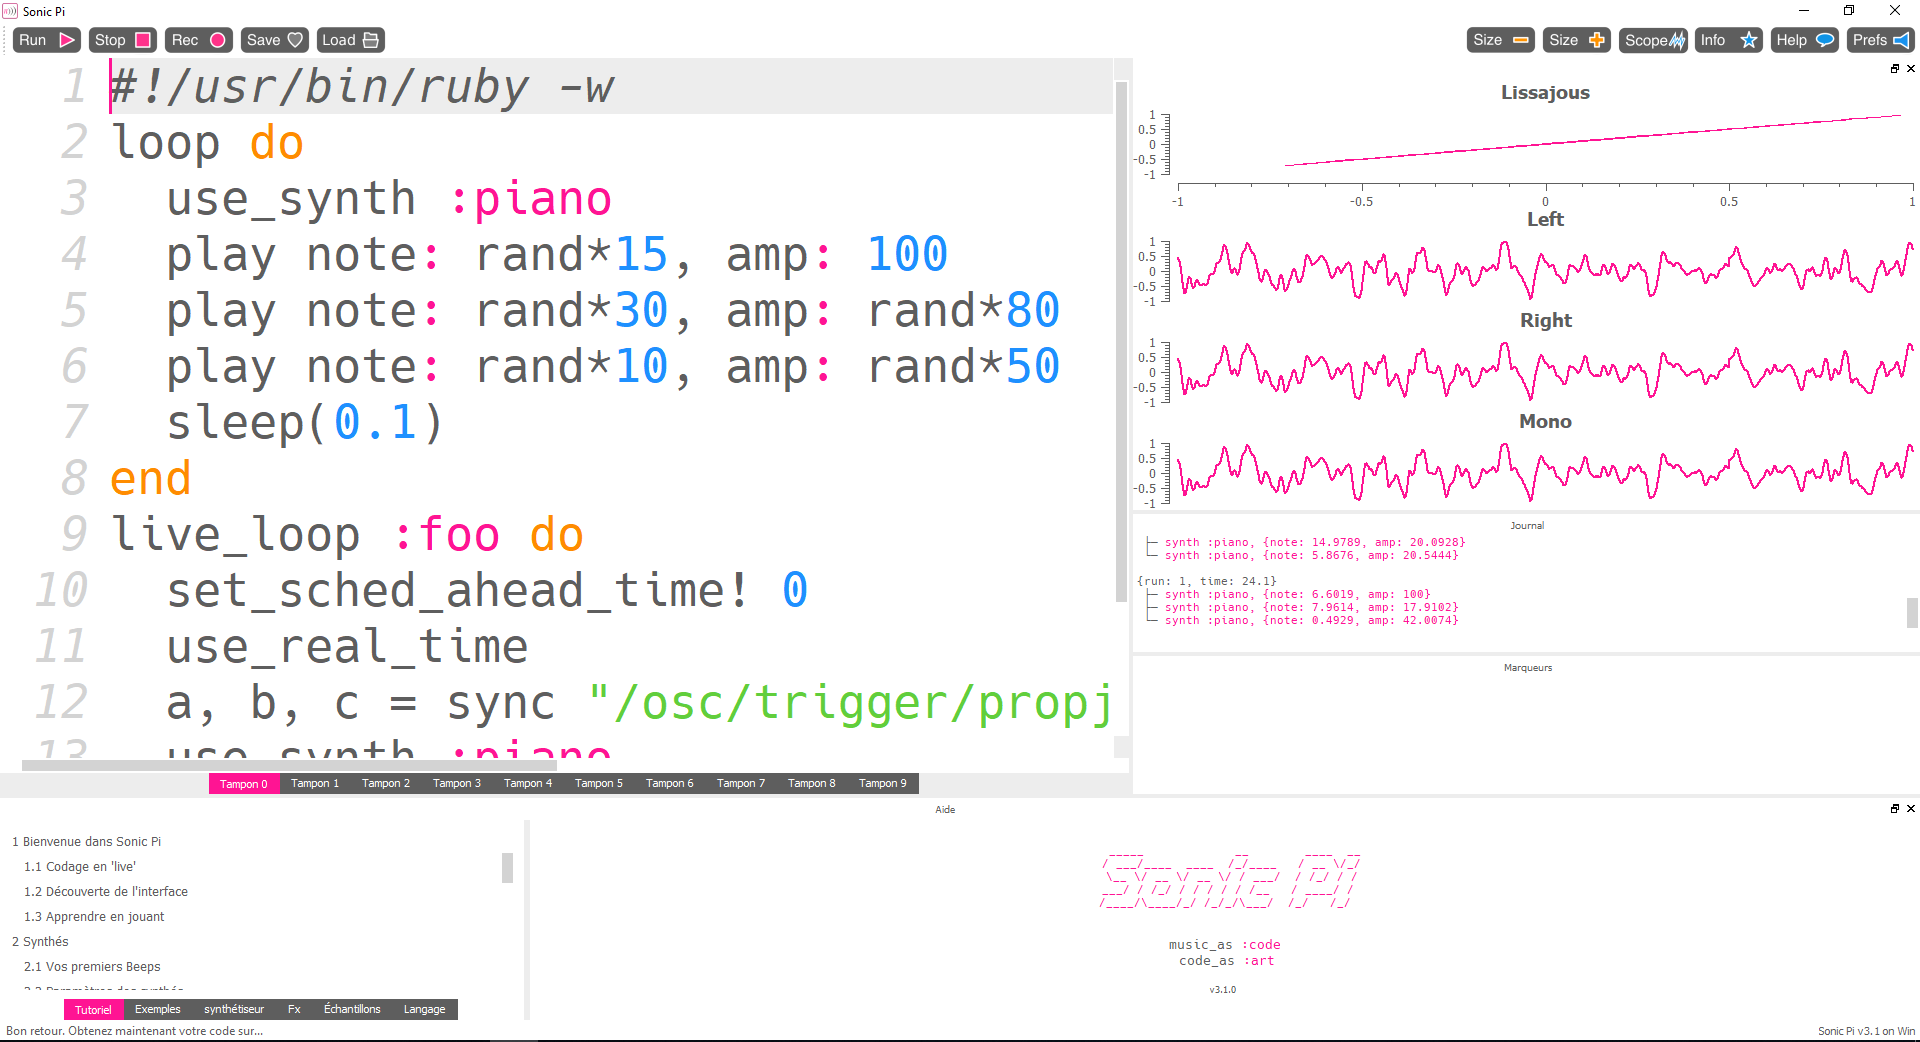
The above screenshot shows how Sonic Pi looks.
Sonic Pi
Sonic Pi can work with several protocols like MIDI and OSC. Musical Instrument Digital Interface protocol is a technical standard that allows digital musical instruments, computers, and other related devices to communicate and synchronize with each other released in the 80’s. Here, we’ll use the second one which is also a communication protocol that enables electronic musical instruments, computers, and other multimedia devices to share data over a network using UDP/IP. Designed to overcome limitations of the MIDI protocol, OSC supports higher resolution, greater flexibility, and enhanced scalability. It transmits a wide range of data types, including messages, parameters, and commands, making it widely adopted in modern digital audio and multimedia environments for real-time interactive control.
By default, the OSC server should be activated locally. If you want to allow other devices to make sound you must enable it in Preferences -> IO -> Networked OSC -> Allow OSC from other computers. Then, here is a simple script making Sonic Pi listening the OSC messages and play notes.
#!/usr/bin/ruby -w

live_loop :foo do
	set_sched_ahead_time! 0                         # reduce latency to minimum
	use_real_time                                   # realtime mode
        a, b, c = sync "/osc/trigger/propjet"           # makes the loop wait on message and get the note, the amplitude and the duration of the note (not used here)
	use_synth :piano
	play note: a, amp: b
end
Here, we use a simple piano type of synthesizer but there is many, see: https://github.com/sonic-pi-net/sonic-pi/blob/dev/etc/doc/cheatsheets/synths.md The OSC server is ready, and listening on local ip on the default port 4559.
Raspberry’s GPIOs
The goal here is to monitor the Raspberry Pi’s GPIO pins and send corresponding messages to our OSC server. Below is a diagram of the Pi 3’s ports.
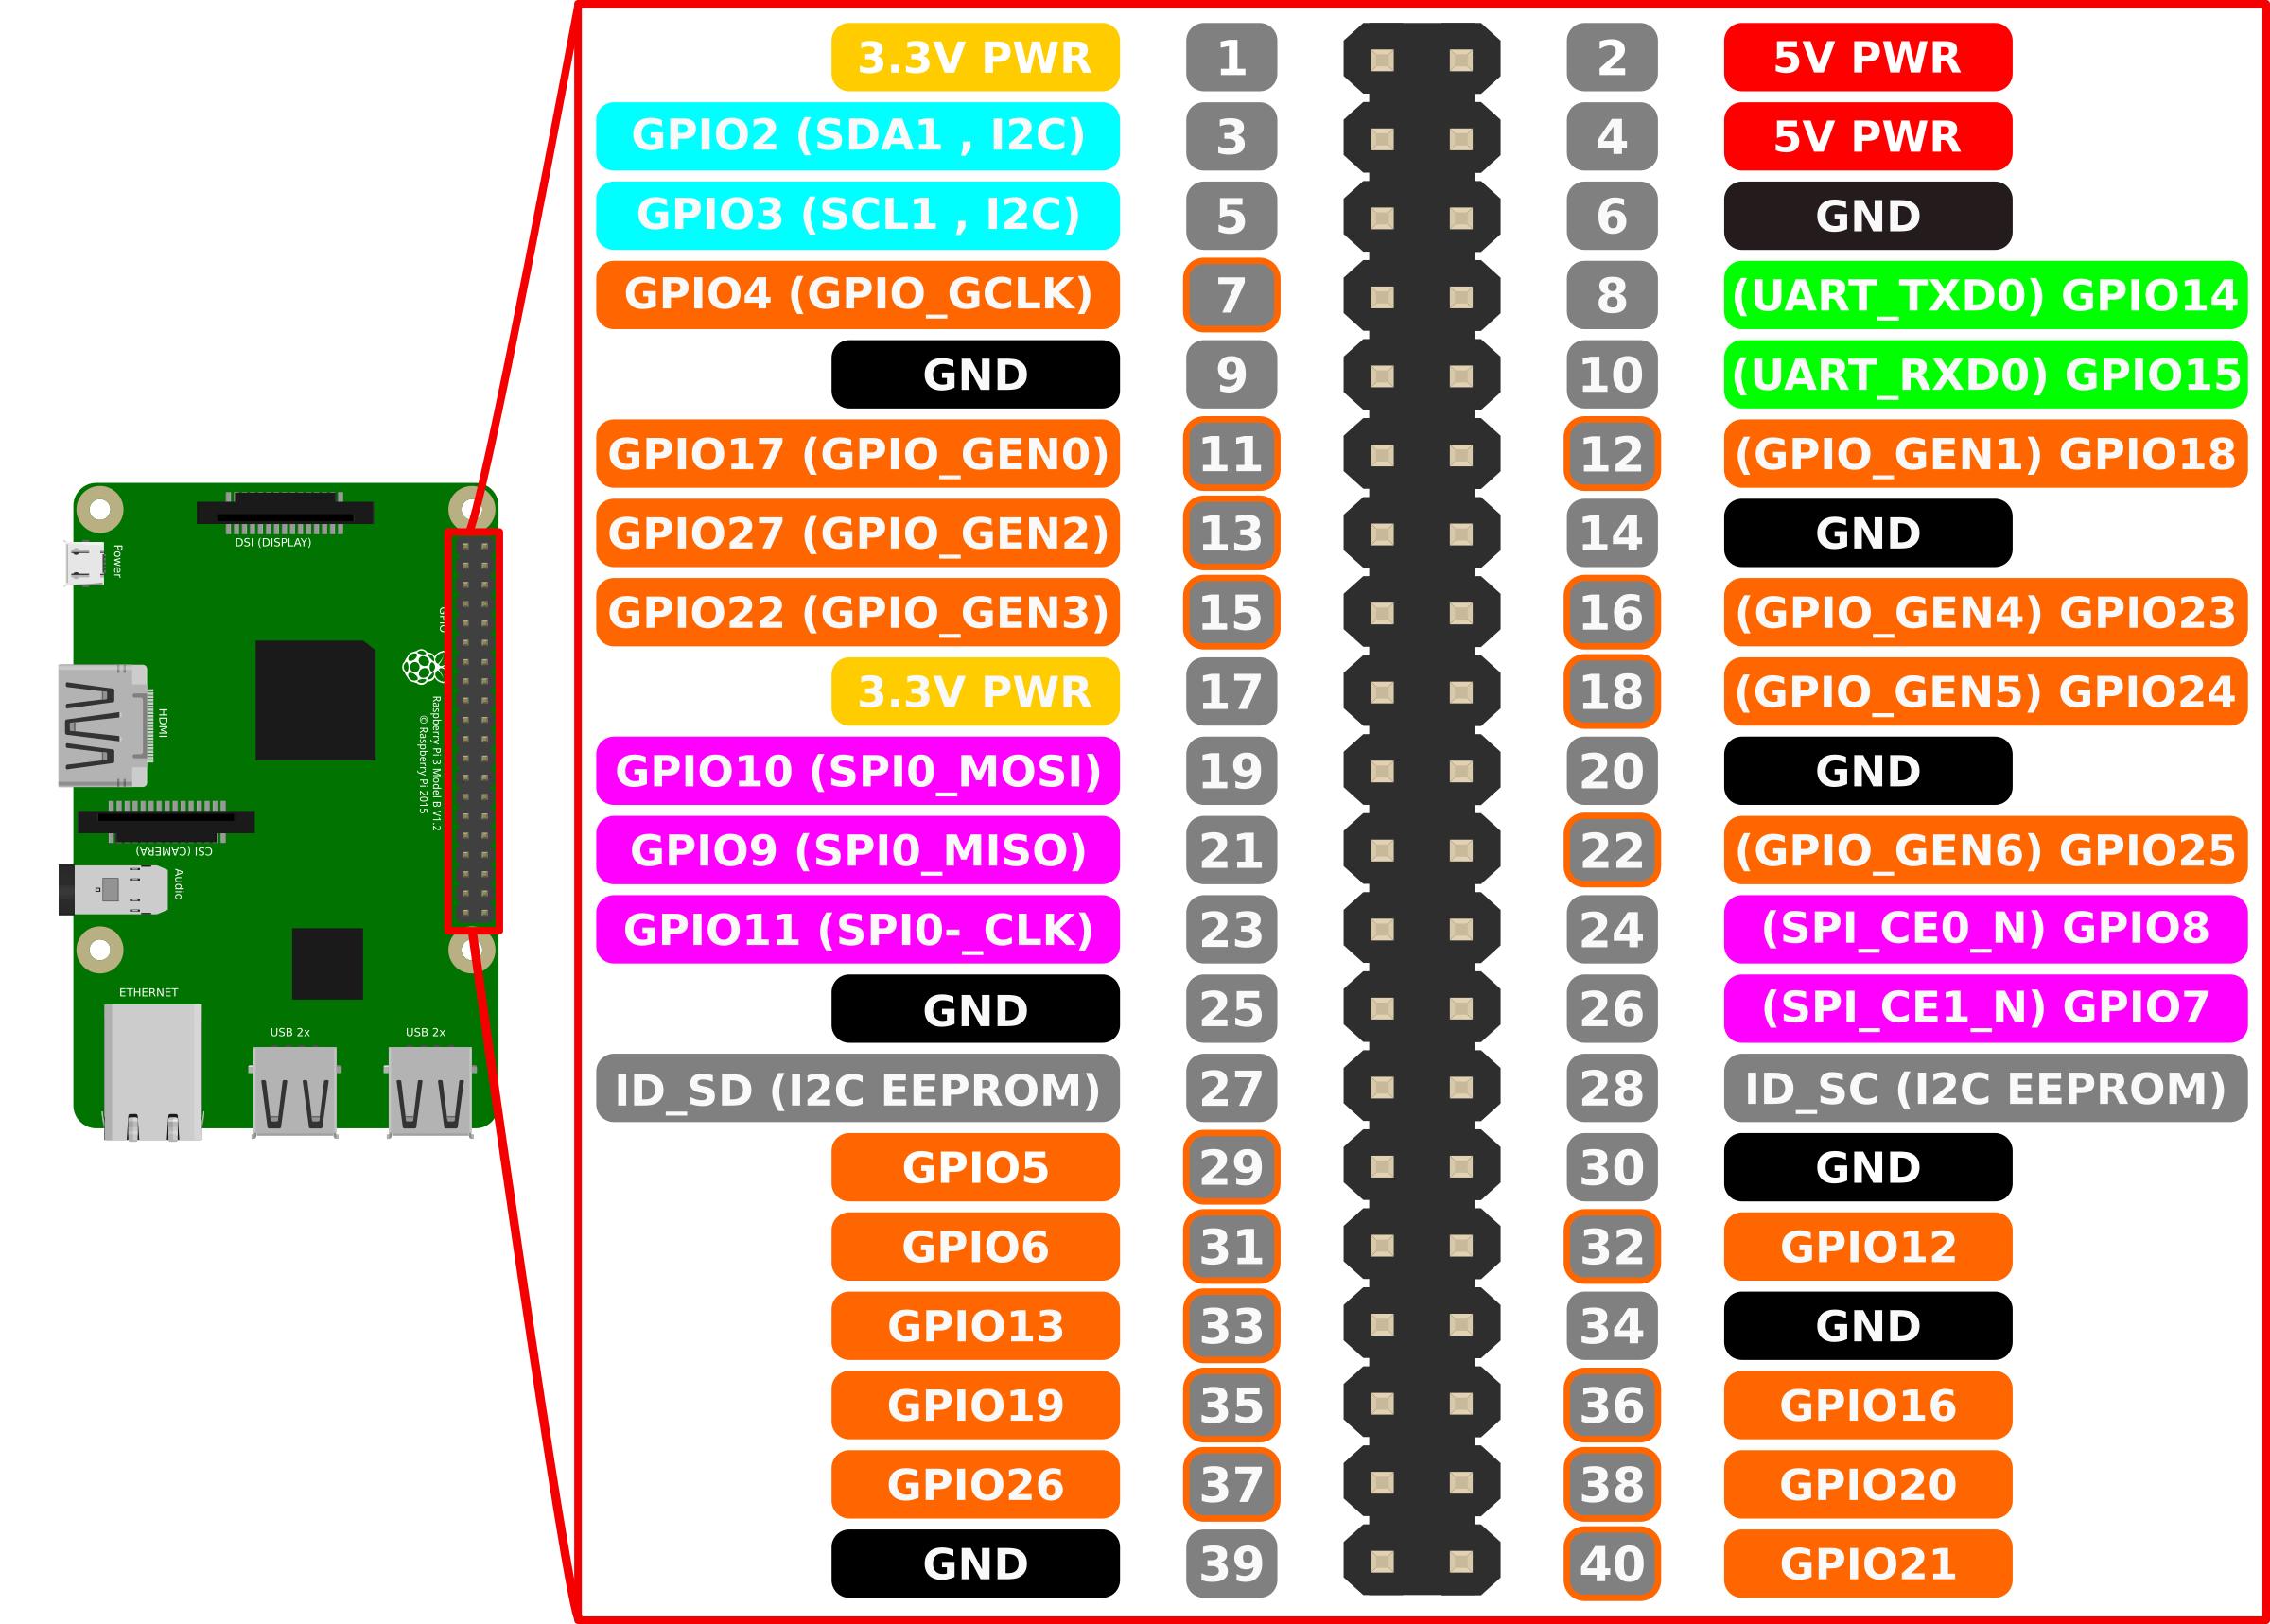
There is a bunch of methods to read GPIO’s on a Pi like Python libraries, C libraries, using sysfs, Java libraries, or even developing a custom kernel device. In this case, we will use the RPi.GPIO package to monitor inputs and the python-osc package to send messages to the OSC server.
Once the necessary packages are imported, the GPIOs need to be configured. Below is an example for setting up a single GPIO:
GPIO.setup(5,GPIO.IN,pull_up_down=GPIO.PUD_DOWN)
In this example, GPIO5 is configured as an input and requires a pull-down resistor. Additionally, a callback function is needed, which will be triggered whenever GPIO5 changes state. The callback function should look like this:
    def callback5(channel):
	sender.send_message('/trigger/propjet',[NOTE1,AMP,8])
The callback5 function will send an OSC message with a specific path (which must match the path used in the Ruby script for Sonic Pi) as the first argument, and a list of values as the second argument. Be sure to initialize the UDP client before:
sender = udp_client.SimpleUDPClient('127.0.0.1', 4559)
Finally, the callback5 function must be linked to GPIO5 through an event. The RPi.GPIO package provides the following method to accomplish this:
GPIO.add_event_detect(5,GPIO.RISING,callback=callback5,bouncetime=100)
callback5 is linked to the corresponding GPIO, and will be called when a rising edge occurs on the pin. bouncetime is the minimum time between two callbacks.
Make it rock!
To generate sound, Sonic Pi must be running, and the Ruby script should be provided to Sonic Pi. After that, the Python script can be executed. Once everything is set up, you can trigger sound by changing the state of GPIO5 pin and connecting headphones to the Pi’s jack.
For more information, you can find sources here: https://github.com/mekiisupertramp/sonic-pi/tree/main
A bit further
For making it fully standalone and usable at Pi’s startup, one could open:
/etc/xdg/lxsession/LXDE-pi/autostart
And add the following line at the end of file:
@lxterminal -e /home/pi/Desktop/run_sonicpi
The script run_sonicpi must run Sonic Pi and Python’s code. Coule be something like:
 #!/bin/sh
 cmd="sonic-pi"
 $cmd &              # startup sonic pi
 sleep 120           # wait sonic pi to be ready (yes, very fast...)
 cat /home/pi/Desktop/ruby_script.txt | sonic_pi # send the script content to sonic pi
 python3 /home/pi/Desktop/gpios_to_sonic.py      # launch the GPIOS script
Now, every time the Pi starts up, Sonic Pi will launch automatically, transforming the Pi into a functional keyboard. Simply power it on, plug in headphones or speakers, and you’re ready to rock!